Thursday, November 17, 2011

To Have and to Hold: Wedding Program Design

Creating wedding programs has been my unofficial business for the past two years. I love designing in Illustrator, Photoshop, and InDesign ever since Architecture school, and it has carried over into designing items for friends, family, and their referrals for weddings. It gives me such creative freedom and I have so much fun thinking up new designs for each couple. These are some items to keep in mind when designing for someone else:

1) Keep the couple's interests and what is important to them as a first priority, this makes each program unique to the couple.
2) Use the wedding colors in a creative way.
3) Make sure to design a size and shape that is easy to print and fold (and cost-effective).

Here are some of the programs I have completed thus far:

The Wedding of Caitlin and Matthew
Back and Front - a folded 8.5 x 11 program
Inside

The Wedding of Erin and Blake
Back and Front - a folded black and white 8.5 x 11 program
Inside

The Wedding of Lisa and Marco
Back and Front - a folded 8.5 x 11 program
Inside

For more information about these programs, or for a request, please contact me, Corrin Wendell, at corrinwendell4@gmail.com. I would be happy to design a program, announcement, invitation, or save-the-date etc for your special occasion!


Shutterfly to the Rescue: Christmas Photo Cards completed!

Thanks to a great friend of mine, I have been able to order some Christmas photo cards for a discount: here is my project on Shutterfly!!

Shutterfly Christmas photo cards!

Enjoy!

Monday, October 10, 2011

It's Sew Easy! Making Pillows and Placemats

For my Grandma's upcoming birthday I decided to make her two pillows for her porch. I had some great leftover fabric from a previous project that would match her decor. Making pillows is very fun and easy! I have previously made pillows for my guest room and have made placemats as gifts. I am working up to making a t-shirt quilt someday. Here's how to make your pillows!

Step One: Pick out your fabric, measure, and cut.

Step Two: Wash and iron all fabric.

Step Three: Layout fabric and decide which combination looks good.

Step Four: Pin fabric and sew pieces together.

Step Five: After pieces are sewn together as one, iron again. Make sure to iron seams down.

Step Six: If you are going to make a placemat, then iron on batting.

Step Seven: Cut and sew back piece of pillow to the front piece. Make sure to leave an opening on one side in order to pull it back through.

Step Eight: After pulling through the fabric so that it is the on the right side, put stuffing in the pillow or insert pillow form. If you are doing a placemat, to finish, after pulling it right side through, then complete with an outer finishing stitch around the perimeter of the placemat.
This is a great project that doesn't take a whole lot of time and is fun and creative! You can customize your pillows to change with the season or redecorate a room in your house. You can also make pillow covers to cover existing pillows from one season to the next. It also makes a great present.

Items You Need:
Fabric
Thread
Pins
Stuffing or Pillow Form
Measuring Stick
Scissors

I Love Paper! Making Your Own Cards

It is a known fact that I love paper - I love buying different prints, thicknesses (weights), and colors. More so, I love making cards for my friends and family for special occasions. For the past couple years I have made my own Christmas cards. For this particular card, I had a wedding coming up and decided to make a card to match the colors of their wedding - blue and black. I thought that this would add a special quality to the card and make the couple feel extra special. Using cardstock and some embellishments, cards can be made in a matter of minutes and make a big impact!

This card was made to match the colors of my friend's wedding.

Finished card with envelope and embellishment on the front.

Step One: Find an envelope that you would like to use.

Step Two: Select a piece of cardstock and measure the envelope to know how large the card should be.

Step Three: Cut your piece of cardstock to the size measured.

Step Four: Find the middle of the card and make a crease.

Step Five: Start embellishing!

Enjoy!

When in Doubt: Freshen Up with a New Knob

Repurposing furniture is one of my favorite pastimes and finding a deal is even better! Sometimes it only takes a coat of paint or a new knob to freshen up a piece of furniture. I found the side tables, dresser, and vanity pieces off of Craiglist for my guest room. The entire room was put together for less than $100. I gave some of them a new coat of paint and wanted to replace the old knobs with new ones that would match the style of my guest room. The guest bathroom yellow sink vanity and the closet doors were also in need of some new knobs as well.

For the most unique looking knobs, I looked around and was able to find some really great ones at Anthropologie. There is such a variety and if you catch them on a sale day, it is the best! I have also been told that Hobby Lobby has some great picks as well.
This bed side table is one of two found on Craiglist. I gave them a fresh coat of paint and added two flower knobs.
I replaced the guest bathroom vanity knobs with these fresh, fun new knobs.
I found this vanity on craigslist and gave it a new fresh coat of paint and some new knobs.
This dresser was $10 on Craiglist! I added four new white knobs to match.
It is always fun and easy to change up existing furniture. Adding knobs is a great way to do that! Good luck with your garage sale, flee market, craigslist, and side of the road finds!

Simple and Easy Wall Art

This is a great way to use an old poster, artwork, or in my case an old map, for a great inexpensive piece of wall art. I had found this old map in the back of my closet which I acquired in Berkeley awhile ago. I decided to put it up in my office as a fun piece of artwork. The print is an old world map in an antique style and goes perfectly in my office.

Step One: Go to the craft store and pick up four cheap canvases from the paint section.

Step Two: Measure and cut the map into four equal pieces.

Step Three: Take each section of the map and wrap it around the canvas and with a staple gun, staple the map to the back of the canvas along the edge.

Step Four: Hang all four sections on the wall so that the image is in the correct order!

Make sure to arrange the image so that is recreates the original map.
Items you will need:
Image (map, poster, artwork)
4 canvases
staple gun
scissors
ruler or measuring stick

Saturday, March 26, 2011

Oh Yeah!: Boring Lamp - Bold Transformation

This is a great project for those of us who like to put our own creative mark on an everyday item. For the guest room (the Door County room) I needed a white lamp to go with the other white items in the room, the bed, the nightstands, the white pillow cases, but I didn't want the lamp to blend into the background, so I gave it a personal touch.

I found some blue iridescent ribbon and some really great fabric covered scrap booking buttons. Both of these items went with the coloring of the room and so I thought it would make a great statement and give the plain white lamp some personality.

It is amazing how handy my architecture tool box has been since I graduated back in 2004. I find that every time I need to get creative it starts with me pulling something out of that box to get going. So I pulled the glue gun and my X-ACTO knife out of the architecture box and began the transformation:

Step 1: Adhere ribbon to white lamp shade
With the iridescent ribbon, I wrapped the shade in an Argyle pattern. Make sure to glue the beginning end of the ribbon first on the interior of the shade. Then, begin wrapping the ribbon from corner to corner to get the argyle look. Finish by gluing the end piece on the inside of the shade where you started.

Step 2: Make small incisions in the shade for the buttons
Since the buttons have a folding metal piece behind them, they are very easy to stick onto the shade. First make sure the make the small incisions with the very sharp X-ACTO knife into the shade and at similar intervals of length. For this lamp, I wanted to make sure that each side had four fabric buttons to make the best impact. After making the incisions, place the buttons into the holes and secure by folding the metal piece on the interior of the shade.

Step 3: Enjoy a creatively personalized lamp with incredible personality!

White lamp with Argyle pattern
Fabric buttons placed evenly onto shade

Thursday, March 17, 2011

Happy St. Patrick's Day!

As an Irish Catholic girl growing up I definitely knew the two most important things to get done on St. Patrick's Day: 1) to make the Irish Soda Bread 2) prepare the Corned Beef and Cabbage. Both of these items were completed today with much love and excitement. I forgot where I had put my mom's recipe for the Irish Soda Bread, but I remembered there were only a few ingredients so I borrowed one from a website and added in dried cranberries as my fruit. What a great soda bread!


Here is the recipe:

Ingredients

  • 4 cups all-purpose flour, plus extra for cranberries
  • 4 tablespoons sugar
  • 1 teaspoon baking soda
  • 1 1/2 teaspoons kosher salt
  • 4 tablespoons (1/2 stick) cold unsalted butter, cut into 1/2-inch dice
  • 1 3/4 cups cold buttermilk, shaken
  • 1 extra-large egg, lightly beaten
  • 1 cup dried cranberries

Directions

Preheat the oven to 375 degrees F. Line a sheet pan with parchment paper.
Combine the flour, sugar, baking soda, and salt in the bowl of an electric mixer fitted with the paddle attachment. Add the butter and mix on low speed until the butter is mixed into the flour.
With a fork, lightly beat the buttermilk and egg together in a measuring cup. With the mixer on low speed, slowly add the buttermilk mixture to the flour mixture. Combine the cranberries with 1 tablespoon of flour and mix into the dough. It will be very wet.
Dump the dough onto a well-floured board and knead it a few times into a round loaf. Place the loaf on the prepared sheet pan and lightly cut an X into the top of the bread with a serrated knife. Bake for 45 to 55 minutes, or until a cake tester comes out clean. When you tap the loaf, it will have a hollow sound.
Cool on a baking rack. Serve warm or at room temperature.

If you do not want to buy a whole half gallon of buttermilk than you can pull a tip from my Grandma and take the same amount of required of regular or skim milk and add a teaspoon of lemon juice and you are all set!

The Irish Blessing


“May the road rise up to meet you, may the wind be ever at your back. May the sun shine warm upon your face and the rain fall softly on your fields. And until we meet again, May God hold you in the hollow of his hand.”


GOOD LUCK!

Sunday, February 6, 2011

Cupid's Arrow and Crafting Organization

HAPPY VALENTINE'S DAY!
It will be St. Valentine's Day in a week and I thought it would be a great time to get some crafting in and make some Valentine's for my friends and family. For me, making cards and having the energy to sit down and create a dozen cards or more has a lot to do with the organization of the crafting room itself. It gives me great joy that everything I need is within reach and all of my tools, paper, and embellishments are labeled and ready for me to dive in.

Organized pens, pencils, paper, scissors, glue etc is the key to a successful craft project.
Organized bins and drawers hold like items such as ribbon, paper scraps, crafting tools, and embellishments.

Throughout the year, I tend to collect fun, festive, beautiful paper, envelopes, and embellishments WHEN THEY ARE ON SALE! This means going into the stores AFTER the holiday has passed and sifting through the goodies to find some treasures. It is also possible to find items a few holidays down the road and add it to your collection.

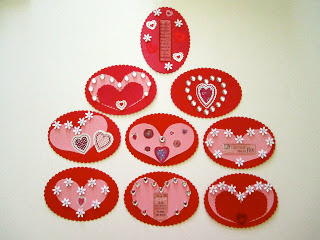
For example, there is a great paper store here in Atlanta called The Paper Source and when I get to the Virginia Highlands I visit and see what items I can score. For this Valentine project, I so happened upon the cutest heart printed envelopes! They were even more special because they were 75% off when I picked them up this past summer. Then just after Christmas I stumbled upon some shiny red scalloped oval cardstock that fit perfectly into the heart envelopes - yay!

Here are the Valentine's that were so much fun to make today!
The super cute heart printed envelopes were a great (on sale) find!